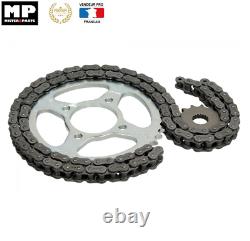
Kit Chain 525 Sprocket 16 Crown 49 Honda Xrv 650 Africa Twin 1988-1990


A real focus of performance and reliability, our chain kits ensure an excellent transmission of engine power to the rear wheel, thanks to friction limitation. Brand: mister parts / jt / sifam. 37 kw(50 ps); 44 kw(60 ps).
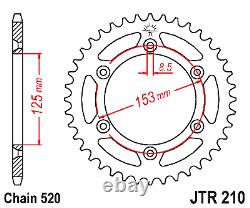
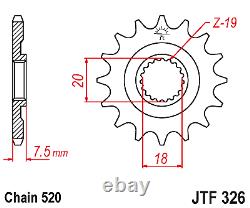
It is advisable to disassemble the part to be replaced beforehand and check the match with the photos and dimensions indicated! Before ordering, consider checking compatibility with your parts and photos!! replacement of the chain kit, some things to know...
How to see if it's time to change? With wear, the chain lengthens and relaxes.
To extend it, the wheel is pulled backwards thanks to the tensioners located against the nuts of the wheel axis. Close to these tendors, we find the tension markers.
They are used to adjust the left and right tendors symmetrically and to see when approaching the limit stroke. If by extending your chain, you reach the end of these landmarks, it's time to change it.
And so in general, to change your chain kit. The teeth of the pinion and the crown.
You can also observe the teeth of the pinion and crown. If they're rounded, even puffed, or totally twisted... It's definitely time to change. You can also test your chain by grabbing it between two fingers at the crown level, and pulling back. If you are able to discover half a tooth of the crown, or more, it is that either you have to stretch, or if you have just done so, that your chain is dead..
to fall a chain kit and change it, things vary pretty much from one bike to another, but here are some answers to the questions that you commonly ask. Closed chain or open chain? First case of figure the chain passes around the oscillating arm..and you can pull out your chain, so reinstall one, without having to open it, or have nothing to disassemble. So you can buy a closed chain, set in the factory. Second possibility, the chain passes through the reinforcement of the swinging arm. Here the question does not arise (the reinforcement is welded), you have to open the chain to exit it, and install an open chain that you will close yourself.
Chain or grinder drive for disassembly, chain bank for reassembly... 3rd possibility, it passes behind the axis, in the swinging arm: vcertains will choose to dismantle the arm, in order not to have to open the old chain, and especially in order to install a closed chain in the factory...That said, it still represents a lot of work, and some will prefer to open the old chain and set the new one. The replacement of the chain kit can be an opportunity to refine the motoricity by playing on the gearbox. In racing, for example, some go so far as to modify their multiplication according to each circuit.
Similarly, the purchase of a pinion with an increasing or decreasing tooth will allow the motor to evolve according to the needs. A smaller sprocket, or a larger crown to increase accelerations, but by limiting the peak speed.A larger pinion, or a smaller crown to pull longer and push the peak speed, but with less accelerations. Open or set a motorcycle chain. Derivating (driving) a motorcycle chain without worries. To derive no problem: either you have a chain drift, or you grind the ends of the two axes on a grid of the chain, then with a screwdriver you blow the plate of the link.
Then you remove this one as you would for a quick tie. River (riveter) a motorcycle chain. To close the chain you have two solutions: either it comes with a quick fastener. Which is rather simple and...
(but often reserved for small and medium-sized cylinders). Either, you have to set the last link yourself. You will get there with a chain bank, which usually costs half as much as a workshop installation... And you will be useful for several installations, or to shorten your chain. Absolutely avoid the hammer to drift and even worse to rivet.
First the result will not be guaranteed, and a chain that opens at full speed... It's more than dangerous. Then because you can distort the chain and cause unhealthy wear and tear.Some tips for disassembly / reassembly. Before you start, measure the actual wear and tear of your chain kit.
Choose the right type of chain. The basic rule, first of all, is never to take a quality inferior to that of origin. Then you can go up to range according to your type of use. Depending on the type of driving. The more sporty your driving and the more powerful your machine, the more important the bumps on the chain.
And so, the more quality you'll have to go up. A road trip obviously does not require the same reliability as a use of mx, trial or gp(or quad, which require a lot of secondary transmission).
Depending on the type of route. Similarly, the hardness of the environment will play.
The uses mx, enduro, trial etc., are more aggressive than the road circuits. In this type of case, we will prefer the oring chains, with o-ring joints that will be better protected from water, mud, sand all these little things that mechanics love.
After winding re-regulate the tension of the chain with the pilot's weight, or even a little more, if you often take an adult passenger. For the winding of the crown, put 2 drops of powerful grease on the threads of the bolts. It's a part of the bike that is heavily subjected to vibrations and shocks. Think that on some models, the shift in gear can result in a change in speed measurement. Think about making the correction. Always adjust the tension with the driver sitting on the bike. The tension of the chain changes with the suspension movement. It is therefore essential to make these motorcycle settings loaded, otherwise you will find yourself with a much more tense chain than expected. It is therefore necessary to be two to perform the operation. After just unlocking the rear wheel axis nut, and the back nut of each tensioner, gradually screw the chain side tensioner (to get to the right voltage), then screw the other in the same way. The tensioners pull the wheel axis backwards, thus stretching the chain. Use the markers on each tensioner to adjust them in the same way.Check if the wheel is centered. You can check the alignment of the wheel with the graduations located on the oscillating arm, or by measuring the distance between the ends of the axis of the oscillating arm and the ends of the rear wheel axis.
Which, of course, must be at equal distance from each side. Before blocking the nuts and against nuts, check that the wheel axis is in contact with the tensioners. Similarly, make sure that the screws of the tensioners are blocked in position, not loose. Re-check the adjustment after final tightening. Sometimes the settings move during tightening.To avoid having done all this for nothing, once everything is blocked, check again the tension of the chain and the alignment of the wheel. Should we walk around a chain kit? In general, the idea is that all rolling parts must be around.
On the chain kit, it may be less visible than on segments (cassage/lock), tires (fall) or pads (glacing), but it does favour a good installation of the three elements (string, sprocket, crown), and even longer their lifespan. Be careful to choose, the method of delivery with pay. The processing times of your order may vary from 4 to 15 working days, contact us before purchasing!! other thousands of pieces with misterbike-en. Anti-flying, batteries, candles, chain kits, sprockets, crowns, chains, clutch discs, air filters,, oil filters, gasoline filter, oils, motor seals, spi joints, brake levers and clutches, grip protections, brake jaws, fixed and floating brake discs, brake pads, motorcycle tires, cross and enduro tires, scooter tires, quad tires, air chambers, lamps and projectors, wheel bearings and steering bearings, spraychain, flashing, retro-visors, fork tubes, cables, tank caps, guidances, bridges, screws, handle caps, valve valves and valve stoppers, contactors, workshop shells, footrests, belts, hatchings, tools, top case and windshields.Helmets, rainwear, anti-cold clothing and accessories, tire heating blanket, etc. 03.25.55.74.71.
Monday to Friday from 9 a. The item "Kit chain 525 sprocket 16 crown 49 honda xrv 650 africa twin 1988-1990" has been on sale since Monday, September 20, 2021. It is in the category "auto, motorcycle - parts, accessories\moto\ spare parts\others". The seller is "misterbike-en" and is located in/in saint-dizier, champagne-ardenne.
This item can be delivered anywhere in the world.
-
Manufacturer part number: not applicable
Mark: - no mark/generic -


